Getting started with Listen
Radarr by Genesys allows you to create and edit topics under the Listen and Engage module.
To get started with creating a new topic, simply follow the steps below:
- Head to System Configuration and Click on Listening Queries
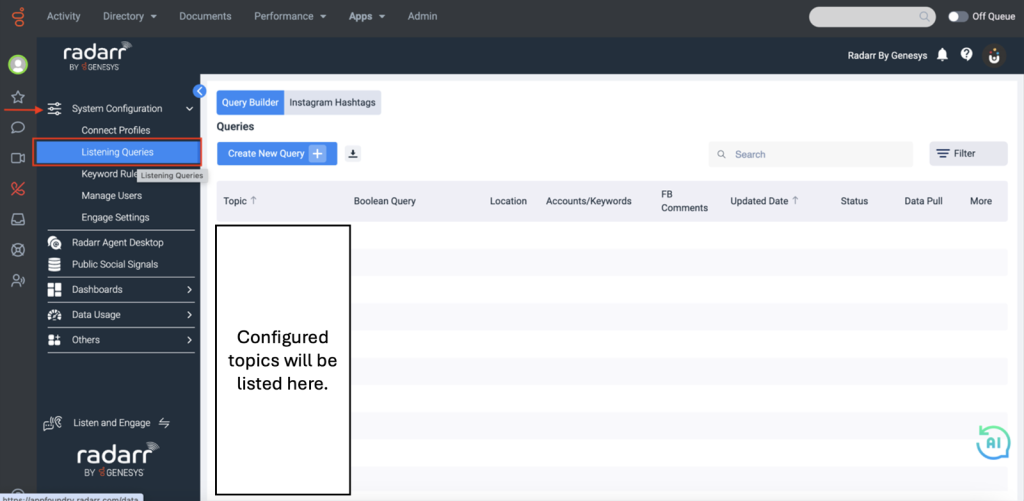
- Accessing your account for the first time would show an empty topic list. The screenshot above shows that the sample platform has previously created topics.
- Select the Query Builder and click on Create New Query to create new Booleans
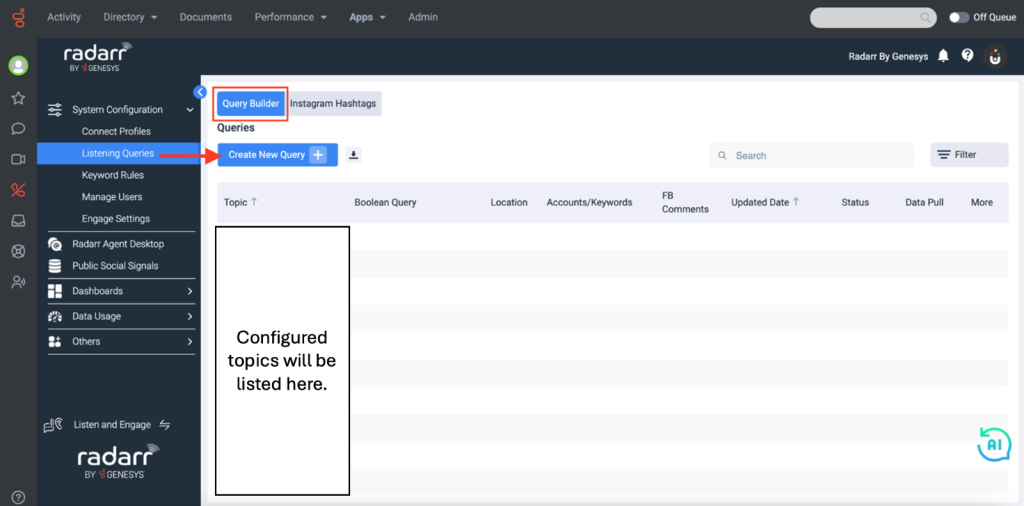
- The “Query Builder” which allows you to create new topics as well as set up accounts for tracking. It has two modes: Beginner and Advanced.
You can use either of the modes according to your convenience
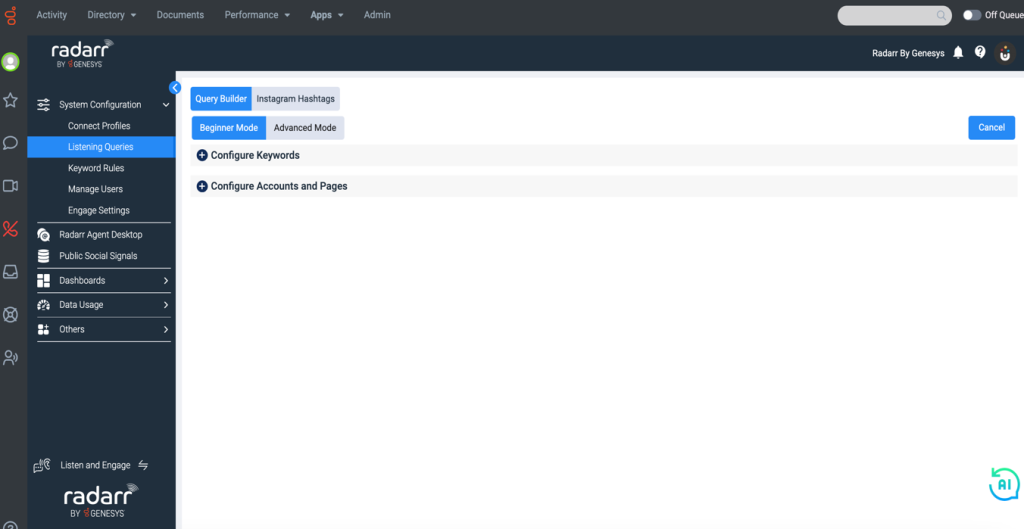
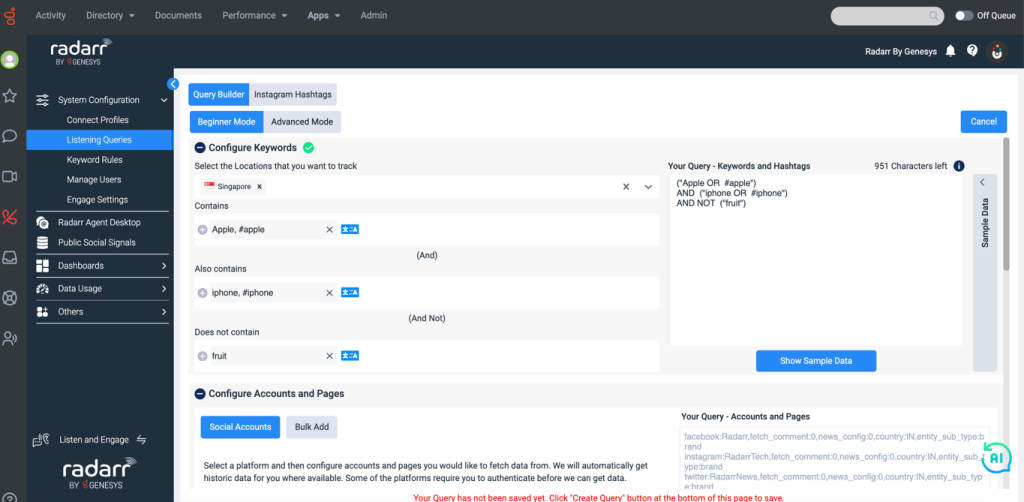
- Under the Beginner Mode, expand the Configure Keywords and start with setting up the keywords required. Select the countries for which you want to collect data from the location dropdown.
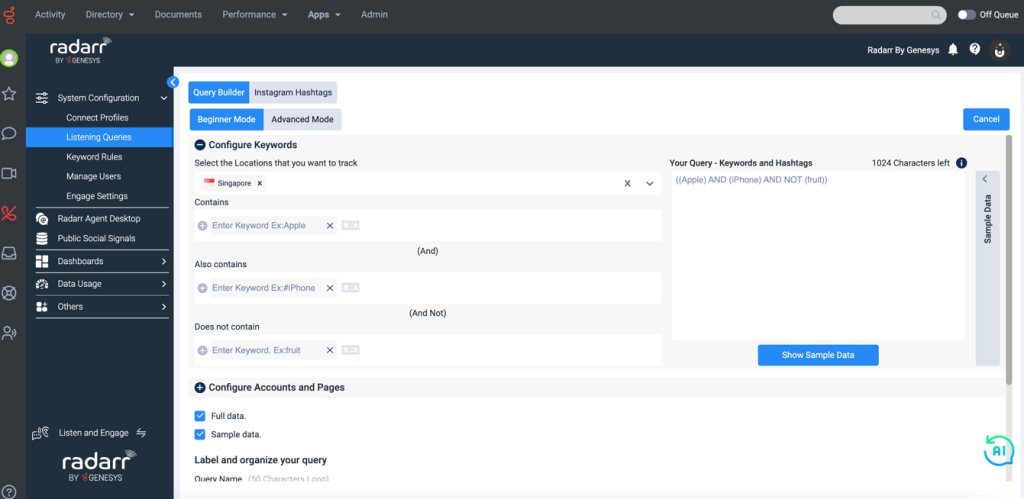
- Please ensure the combination of operators and keywords reflect the topic that you want to track as it would directly affect the relevancy and accuracy of your Boolean.
An example is shown below
The Boolean gets created on the right window for every keyword you input on the left window. Once done, you can click Show Sample Data to view the sample data.
- Under the Advanced Mode, expand the Configure Keywords and start with setting up the keywords required. Select the countries for which you want to collect data from the location dropdown.
- Once you are ready with your query, click on the “Validate Query” button. This will check for any errors in your Boolean.

- Tweak and correct your Boolean if there are any errors.
- Once ready, click on “Show Sample Data” to view sample posts that you can expect to get once your topic is active.

- This will give you sample results from our database as well as show you real-time posts from X/Twitter. This is an effective way to identify if your Boolean is accurate to the topic you want to track.
- You can also configure social media pages as part of your topic if you want to track all posts and comments from those pages. Click on the plus icon on “Configure Accounts and Pages” then “Social Accounts” which displays the social media platforms that can be configured for tracking. Please select the desired platform and proceed.

Note: Only public accounts and pages can be configured. The tracking of private accounts is not allowed due to the different social media platforms’ privacy policies.
- Input the account name as shown below and click “Verify”. Select whether you would like to capture only posts or even comments from that account/page.
For YouTube, you need to input the account URL to configure.

- Once the account is verified, you will be able to select the location of the account.
- Select the Entity Type, depending on what you’d like to configure your account as. Below is a classification of entity types:
Male: If the account is of a person and the gender is Male
Female: If the account is of a person and the gender is Female
Person-Unknown: If the account is of a person and does not have a specified gender
Brand: If the account is of a brand/company
News: If the account is of a media organization
Unknown: When no entity information about the account is available
Your entity selection will determine the entity tagging for all posts and comments that will be captured for that page. If the main objective is tracking comments from an account, we recommend selecting the “Unknown” entity to minimize inaccurate entity tagging. Gender data isn’t available for most comments data due to social media platforms’ privacy policies.

- Once all fields are filled out, click “Add” then “Save and Continue”.

- Once you are done inputting your Boolean and configuring social media pages (if any), provide a name for your topic and sub-topic. This text input section is located at the bottom row of the “Query Builder” popup window.

- Please ensure your topic or sub-topic names are unique from the other topic and sub-topic names and do not contain any special characters such as */#!@~&()[]?$%
- Once ready, click on “Create Query”
- After creating a topic, you can view all sub-topics under each topic by clicking the “+” icon next to each topic name.
- Please note that only one topic can be created per account for the Radarr by Genesys Appfoundry trial. The limit for the data to be pulled for your Listening Query is 50,000 posts for the one-month trial. For paid subscriptions, please refer to the SKUs purchased by your company. Please refer to this article to see how you can monitor your data usage.
Additional steps when configuring Instagram hashtags:
While you may include hashtags in your Boolean, if you need to capture data on Instagram, there is a separate tab where you need to enter these. A valid Instagram token should be authenticated to capture posts from this platform, following Meta’s privacy policy.
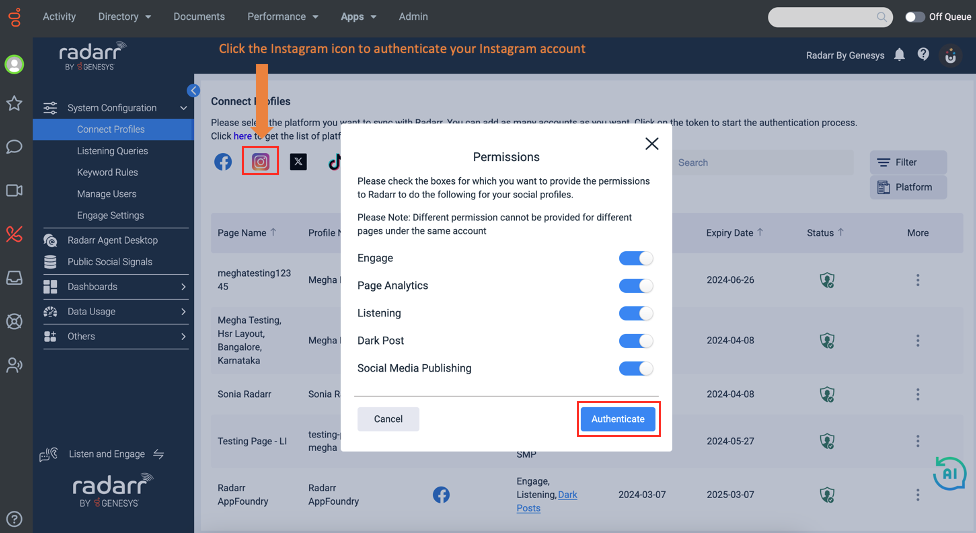
- To authenticate an Instagram account, go to System Configuration > Listening Queries > Instagram Hashtags. This will direct you to the “Connect Profiles” tab where you should select Instagram and the Permissions you would like to grant Radarr by Genesys. For capturing data on Instagram, “Listening” permission is required, but you may also select the other permissions to get data in other Radarr by Genesys functions/modules. After selecting your required permissions, click “Authenticate”. This will open a prompt on Meta that you need to follow step-by-step. Before moving on, double-check that only the pages or accounts you want to connect with Radarr by Genesys are selected. If any other pages or accounts are pre-selected, deselect them before proceeding to the next step. Your Instagram account will appear under the “Connect Profiles” list after successful configuration.
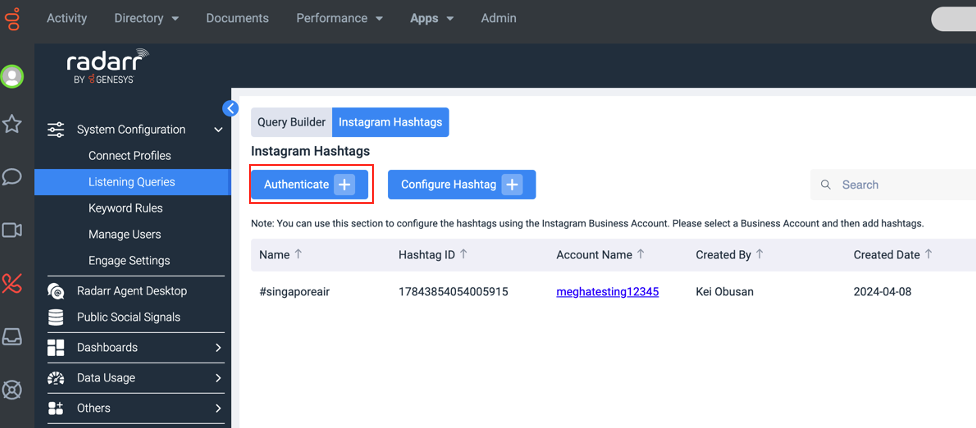
- To add a hashtag for capturing Instagram data, click the “Instagram Hashtags” tab.
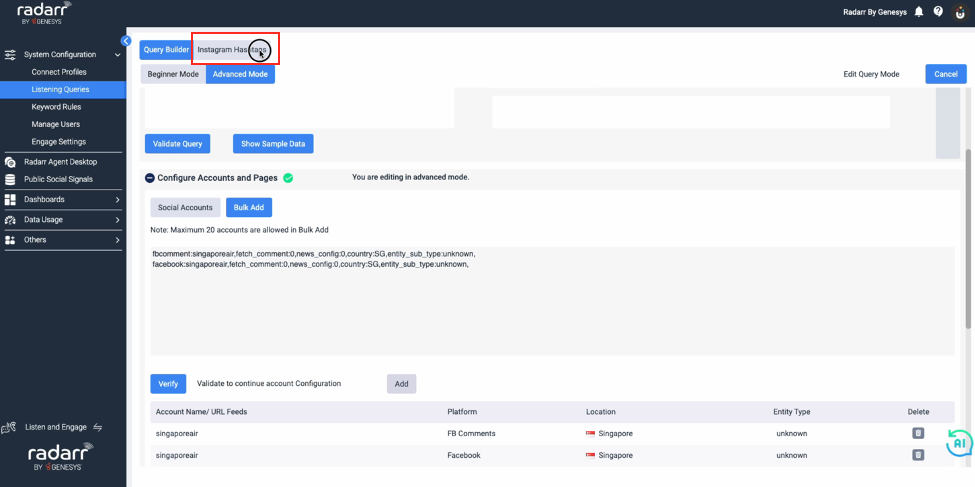
- Click “Configure Hashtag”

- Select the authenticated Instagram account you would like to use to configure hashtags. Only 30 hashtags can be configured for every Instagram token authentication.
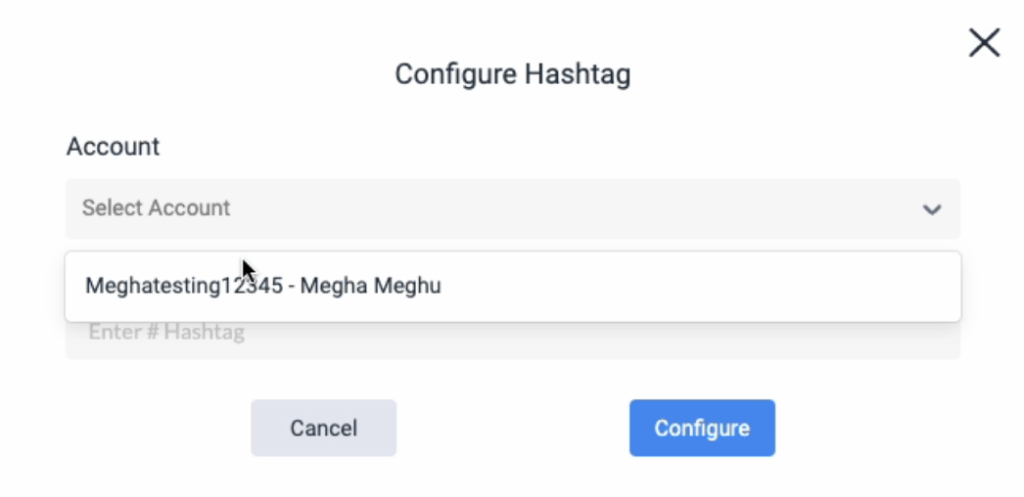
- You need to enter each hashtag one by one on the “Hashtag” field. Click “Configure”.

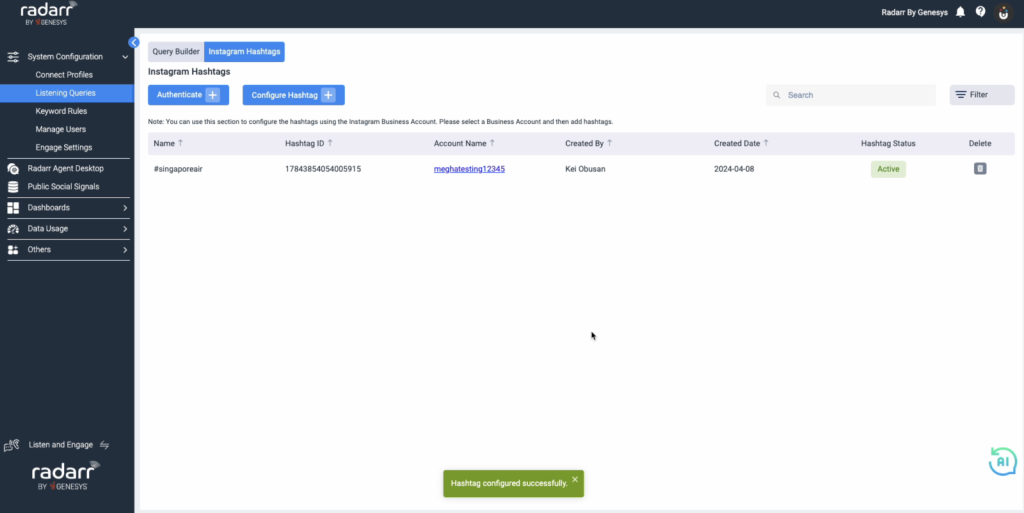
- The hashtag will be added to the “Instagram Hashtags” list once the configuration is successful.
For additional information about Radarr by Genesys features, you may access our 24/7 Support Hub, training materials, and FAQs through this link – Radarr by Genesys Help and Support – Radarr by Genesys Support and Knowledge Base. You may also send us an email at cssradarrsupport@genesys.com.